Mission Command at the Tactical Level: Operation Deadstick
by CPT W. Paul Hill
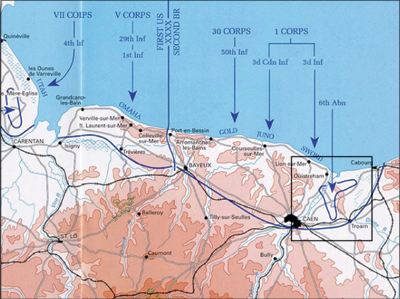
Figure 1 — Operation Overlord Overview (Map from Normandy: The U.S. Army Campaigns of World War II, http://www.history.army.mil/brochures/normandy/nor-pam.htm)
The U.S. Army has been working since the end of the Civil War to develop a system that enabled decentralized execution in our maneuver units. This has resulted in numerous failed attempts, most recently the network-centric Revolution in Military Affairs (RMA) of the 1990s. After more than a decade of war, the Army’s leadership has realized that it is not a system that was needed but to institutionalize a culture and philosophy of command based on trust, understanding, and intent. The Army’s Doctrine 2015 has codified this as mission command. Army Doctrine Publication 6-0, Mission Command, defines mission command as “the exercise of authority and direction by the commander using mission orders to enable disciplined initiative within the commander’s intent to empower agile and adaptive leaders in the conduct of unified land operations.”
With the adoption of mission command into the U.S. Army’s doctrine, it has become commonplace for us to look to our own history for examples of leaders and operations demonstrating these traits and philosophy successfully. We have examples throughout our history, to varying degrees. The study of Grant, Sheridan, Lee, Longstreet, Patton, Bradley, and Eisenhower provide excellent examples of command styles that included empowering subordinates and exercising disciplined initiative. However, they are all in an operational or strategic context. In order for company-grade officers to understand the practical application of mission command at the tactical level, it is essential to study historical company-level operations in-depth. This enables greater understanding of both the art of command and the science of control. It is vital for maneuver leaders to study operations at the tactical level in order to understand that under mission command sufficiently detailed planning and providing flexibility to their subordinates are not mutually exclusive, but in fact enhance each other. An excellent example of a company operation recorded in sufficient detail to provide this necessary depth is Operation Deadstick.
Operation Deadstick, the coup de main seizure of the bridges over the Orne River and Caen Canal (now commonly referred to as Pegasus Bridge), was one of the most rapid and decisive victories of the D-Day invasion of Normandy in 1944. Joint Publication 1-02, Department of Defense Dictionary of Military and Associated Terms, defines a coup de main as “an offensive operation that capitalizes on surprise and simultaneous execution of supporting operations to achieve success in one swift stroke.” The unit assigned to execute Deadstick on D-Day was D Company, 2nd Oxfordshire and Buckinghamshire Light Infantry, commanded by Major John Howard. During Howard’s attack, his company secured all of its objectives in under 10 minutes with minimal casualties. While many factors contributed to the success of Deadstick, the primary reason for the mission’s success was Major Howard’s ability to lead his company in a manner that adhered to what we now refer to as the principles of mission command.
During the planning stages of the Normandy invasion, Field Marshal Bernard Law Montgomery, the commander of the Allied 21st Army Group, decided to secure the left flank of the Normandy beachhead by landing the British 6th Airborne Division on the west side of the Orne River. One of the primary tasks of the division was to secure and maintain a viable avenue of approach toward the city of Caen for the armored forces landing on Sword and Juno beaches.1 To accomplish this and to prevent the Germans from flanking the landings, Major General Richard “Windy” Gale, the division commander, decided to seize the two bridges crossing the Orne River and Caen Canal — intact. Because the two bridges were only 500 meters apart, the only way they could accomplish this was by glider assault. Gale conferred with the commander of the 6th Airlanding Brigade, Brigadier Hugh Kindersley, and developed a concept for a coup de main assault by a glider force.2
From 25 to 27 March 1944, the 6th Airborne Division conducted a three-day exercise named Bizz. The purpose of this exercise was to validate the soundness of the coup de main concept and to determine the unit most likely to succeed in its execution. Gale and Kindersley were particularly impressed with the performance of D Company of the Oxfordshire and Buckinghamshire Light Infantry and Major Howard. At the de-briefing for Bizz on 15 April 1944, Gale highly praised Howard and his company.3 Following the de-briefing, Howard’s battalion commander, Lieutenant Colonel Michael Roberts, informed him of the purpose of the exercise.
“Colonel Roberts faced me across the desk and, holding my eye, told me that ‘D’ Company, plus two platoons of ‘B’ Company and thirty Sappers under command, were to have a very important task to carry out when the invasion started. The Colonel went on to tell me that our task would be to capture two bridges intact.”4
Roberts informed Howard that his unit’s mission was classified top secret and ordered him not to share it with his subordinates yet; he tasked Howard, and the reinforced D Company, with capturing bridges during the corps-level Exercise Mush that took place at the end of April 1944. With the specific mission in mind, Mush provided Howard several crucial lessons for the development of the assault plan.
“I learned that, above all, my plans must be flexible. It was made clear to me in that exercise that events would take place incredibly fast, but in what order and who would carry out the task, was entirely in the lap of the gods. I realized that the chances of us all getting to our destination in the order we wanted was remote.”5
Howard incorporated the lessons learned from Mush into the evolving plan and executed an intense training program for his company. One key lesson Howard realized was that he would not be able to control both bridge assaults effectively due to their distance apart. In order to compensate for this, he task organized D Company into two assault teams of three platoons and attached Sappers, flying in three gliders. The assault teams would hit the bridges simultaneously with Howard leading the Caen Canal element and Captain Brian Priday, the company executive officer, leading the Orne River Bridge element. D Company then began an exhausting process of running rehearsals with the mock bridges marked off with engineer tape. Major Howard varied these rehearsals by the number of platoons that arrived, the order in which they arrived, and by making key leaders casualties. According to some of Howard’s men, every attack brought numerous lessons to the unit of what to do, how to do it, and most importantly what not to do. Private Billy Gray recalled D Company’s rehearsals, “We knew exactly what we had to do. We trained and practiced it so often that we knew it like the back of our hand. Anyone could have taken each other’s place.”6 During maneuvers in May 1944, Lieutenant Colonel Pine-Coffin of the 7th Parachute Battalion discovered a pair of bridges that very closely resembled D Company’s D-Day objective. He contacted Howard and showed him the bridges. Major Howard then moved his entire company to Exminster and assaulted these bridges for five days, incorporating numerous live-fire exercises.7
The assault force integrated with the glider pilots when the company moved to its transit camp in Tarrant Rushton in May of 1944.8 These 14 specially selected glider pilots had been training for this specific mission for months. Their training consisted of 43 training flights in different weather conditions, with night and instrument flying, using stopwatches for accurate course changes.9
On 5 June 1944 at 2256 hrs, the six Horsa gliders, towed by Halifax bombers, departed Tarrant Rushton’s airfield carrying the coup de main party.10 Just more than an hour later, at 0007 hrs on 6 June 1944, the first glider, piloted by Staff Sergeant John Ainsworth and Sergeant Jim Wallwork, detached from its tug aircraft and put to work all of the training they had done over the previous months. Ainsworth counted time on a stopwatch and told Wallwork when to turn. This process continued for several minutes with the Soldiers in the back of the glider remaining silent as they approached their objective. Ainsworth and Wallwork brought their glider in on course but too high. At 0016 hrs, through an incredible feat of flying, they were able to land within 100 yards of the objective and breach the wire around it by crashing the glider through it. The other two gliders from their element landed right behind them. Sir Trafford Leigh-Mallory, the Allied Expeditionary Air Force commander in chief, later described this as “the finest piece of pure flying of World War II.”11
The platoons immediately moved to their objectives, with Lieutenant Den Brotheridge’s 1st Platoon in the lead. Its objective was to secure the weapon pits on the far side of the bridge. The platoon encountered two German sentries while crossing the bridge. The British soldiers were able to eliminate the sentries quickly, however, not before one of the Germans was able to fire a signal flare. The firing alerted the MG-42 machine-gun position on the far side of the bridge, and the Germans there began suppressing across the bridge, fatally wounding Brotheridge as the platoon assaulted across the bridge.12 After destroying the MG-42 position, 1st Platoon continued its assault and attacked the enemy positions on the far side of the Caen Canal Bridge. Captain Jock Nielsen and his sappers immediately began searching the bridge for explosives and cutting any wires they found.13
Second Platoon, led by Lieutenant David Wood, immediately moved to destroy a 75mm anti-tank gun and then began clearing the enemy trenches and bunkers on the near side of the Caen Canal Bridge. Wood and his platoon started near the bridge and began clearing out to the left and right using hand grenade and sub-machine gun fire. During the course of clearing the trenches, the enemy wounded Wood and his platoon sergeant, who placed Corporal Godbold in command.14
Lieutenant Sandy Smith’s 3rd Platoon suffered a much harder landing than the other two platoons did. Its glider came apart on landing and partially submerged in a small pond, ejecting and drowning one Soldier. Smith maneuvered his platoon to the bridge as quickly as possible and reported to Major Howard. Howard then ordered Smith to take 3rd Platoon across the bridge and support 1st Platoon in destroying the enemy positions and buildings on the right side of the road. First Platoon was to take the left side of the road.15
At 0021hrs, resistance at the Caen Canal Bridge had died down, and Howard began to get reports. D Company had secured the first bridge. The engineers found that the bridge was prepared for demolition, but the Germans had not emplaced the charges yet. Lieutenant Brotheridge was wounded and unconscious. Sergeant Ollie, the platoon sergeant, seriously injured his back and ribs on the landing. This placed Corporal Caine in command of 1st Platoon.16 Lieutenants Smith and Wood were wounded, and Major Howard had heard nothing from the Orne River Bridge.17
Lieutenant Dennis Fox’s 5th Platoon landed by the Orne River Bridge while Major Howard was being updated on the situation. An MG-34 machine gun engaged 5th Platoon as it assaulted toward its objective; however, the platoon’s 2-inch mortar quickly eliminated the MG-34.18 The platoon then continued to the bridge and secured it. A few minutes later, Lieutenant Tod Sweeney and 6th Platoon joined 5th Platoon on the Orne River Bridge. The platoons established their defensive positions, set the sappers to checking the bridge for explosives, and radioed Major Howard that the Orne River Bridge was secured.19
Less than 10 minutes after he had landed, Major Howard ordered his radio operator, Lance Corporal Ted Tappenden, to transmit the success codes of “Ham” and “Jam.” Tappenden continued to transmit the codes while Howard used his whistle to blow the Morse signal of V for victory to alert his company that both bridges had been secured.20 He then began the process of organizing the company’s defense of the bridges. As the majority of the 6th Airborne Division was going to be landing on the west side of the bridges, Howard saw the east of the Caen Canal Bridge to be the most likely route of an enemy attack. He ordered Smith to coordinate a defense from the trenches on the far side of the Canal Bridge with his platoon and 1st Platoon. Godbold moved 2nd Platoon and secured the buildings near 1st and 3rd Platoons’ positions on the far side of the Canal Bridge. Fox led 5th Platoon on patrols to the east of the Canal bridge defenses. Sweeney’s 6th Platoon established a defense of the Orne River Bridge. Once Captain Nielsen and his sappers completed a more detailed inspection of both bridges, they patrolled between the bridges.21 Meanwhile, Major Howard became concerned about the whereabouts of Captain Priday and Lieutenant Tony Hooper’s 4th Platoon. He did not find out until 7 June that the Halifax bomber towing their glider released too early due to anti-aircraft fire and it had landed more than five miles away from the objective.22
During the night, D Company had a series of short but incredibly violent defensive engagements. Sixth Platoon engaged and destroyed a scout squad and two enemy motorcycles and captured Major Hans Schmidt, the commander of the local garrison, when he drove to the bridge in his SdKfz 50 Half Track.23 Fox’s 5th Platoon established an anti-armor ambush and destroyed a tank with a PIAT (Projector, Infantry, Anti-Tank), denying that avenue of approach to the enemy.24 At 0300 hrs, the 7th Battalion of the 5th Para Brigade passed over the bridges and through to the town of Benouville. This placed the 7th Para Battalion between D Company and the majority of the German forces, allowing them to consolidate and reorganize.
At approximately 0700 hrs, a German gunboat moved up the Caen Canal toward D Company. When the gunboat began to engage with its 20mm cannons, Godbold’s platoon engaged it with machine guns and its PIAT. Second Platoon forced the gunboat aground and captured the crew.25
At 1300 hrs, Lord Lovat and his famous Commando Brigade relieved D Company. Lovat and his commandos had landed with the first wave on Sword Beach and marched inland directly to relieve D Company.26 Up to the time of its relief, D Company’s casualties were 14 wounded and two killed.
The success of Operation Deadstick secured lines of communication for the British 6th Airborne Division from its location east of the bridges to the Normandy beachhead to the west. Additionally, possession of the Orne River and Caen Canal bridges provided the 21st Army Group with a viable avenue of approach to the city of Caen.
A Mission Command Culture
Major Howard not only successfully incorporated what we now call mission command into his planning and execution, but he made it a constant part of D Company’s culture. His personal leadership and collaborative method of planning enabled the company to become a cohesive team that was capable of reacting faster to changing situations than the enemy. He had an understanding of the proper balance needed to deliver effective mission orders. Rehearsals had shown that the initial seizure of the bridges would actually take less time than it would to set up the command post. To Howard, this meant that his largest influence on the mission would actually be in the planning phase before the battle, not during it. He had to plan the operation in sufficient detail to effectively synchronize and coordinate his platoons while ensuring his subordinates had the flexibility to adapt to a very fluid situation. Because he did not know in what order the platoons would be landing, Howard assigned both assault elements critical tasks and purposes with timelines and phases. This way, no matter what order the platoons arrived in they could immediately adjust and move to the next objective. The platoon leaders did in fact have to adjust on the ground due to a variety of reasons: losing one platoon and the company executive officer, platoons landing at unplanned distances, and quickly losing several key leaders. However, Howard’s clear, flexible orders combined with his soldiers’ understanding of the mission and the commander’s intent enabled the platoons to quickly adjust and seize both bridges in less than 10 minutes.
Howard created a shared understanding of the mission and tactical problem through his training program and intensive rehearsals. These reinforced the importance of complete understanding of the plan by every Soldier. Howard incorporated his Soldier’s lessons learned from post-rehearsal after action reviews (AARs) in order to not only refine his plan, but to increase D Company’s level of engagement. This involvement in the collaborative process enabled Soldiers at every level to understand all of the mission’s critical tasks. Howard understood that junior leaders had to be able to understand their superiors’ jobs and be capable of filling those roles if the company was going to develop the mutual trust necessary to operate effectively. This type of trust enables a considerable amount of operational freedom within the unit, but requires a lot training to achieve and deteriorates rapidly if not maintained through training. The fact that junior leaders such as Corporals Caine and Godbold were able to take over their platoons and still rapidly execute the mission demonstrated that a shared understanding of the mission existed down to the lowest level.
D Company trained for this specific mission for more than two months, was highly proficient in securing bridges, and had a great deal of confidence in its leadership on D-Day. Howard’s orders and intent were clear and easy to understand, and the entire company knew not only the critical tasks, but that speed was a vital to success. Together, these factors enabled leaders throughout the company to exercise disciplined initiative. ADRP 6-0 defines disciplined initiative as “action in the absence of orders, when existing orders no longer fit the situation, or when unforeseen opportunities or threats arise.” Lieutenant Fox seizing the Orne River Bridge with only 5th Platoon is an example of how the speed of the assault requires leaders to exercise initiative combined with their understanding of the commander’s intent. The original plan was for Captain Priday to lead an assault force consisting of 4th, 5th, and 6th Platoons to seize the bridge together. Neither Priday nor 4th Platoon arrived, and 6th Platoon landed a considerable distance away. Rather than waiting for 6th Platoon to make their way to him, Fox capitalized on the Germans’ momentary confusion and successfully seized the bridge with only 5th Platoon.
While there was no formalized doctrine related to mission command within the British or U.S. Armies at the time, Howard led his company in a manner that capitalized on the principles of mission command and enabled D Company to rapidly seize, retain, and exploit the initiative from the German forces. Operation Deadstick is an excellent example of mission command for leaders at the tactical level, and the fact that it occurred 70 years ago demonstrates that these principles are enduring and remain relevant.
Notes
1 Ken Ford and Steven Zaloga, Overlord, The D-Day Landings (Oxford, England: Osprey, 2009), 207.
2 Will Fowler, Pegasus Bridge, Benouville D-Day 1944 (Oxford, England: Osprey, 2010), 12.
3 John Howard and Penny Bates, The Pegasus Diaries, The Private Papers of Major John Howard DSO (Yorkshire, England: Pen & Sword, 2008) 86-88.
4 Ibid, 89.
5 Ibid, 91.
6 Fowler, Pegasus Bridge, 15.
7 Howard and Bates, The Pegasus Diaries, 100.
8 Ibid, 104.
9 Stephen Ambrose, D-Day (NY: Touchstone, 1994), 142.
10 Ford and Zaloga, Overlord, 214.
11 Howard and Bates, The Pegasus Diaries, 117-119
12 Cornelius Ryan, The Longest Day (NY: Touchstone, 1959), 111-112.
13 Fowler, Pegasus Bridge, 42.
14 Ibid, 38.
15 Howard and Bates, The Pegasus Diaries, 122.
16 Ibid, 124.
17 Fowler, Pegasus Bridge, 41-43.
18 Ibid, 42.
19 Howard and Bates, The Pegasus Diaries, 123.
20 Fowler, Pegasus Bridge, 43.
21 Howard and Bates, The Pegasus Diaries, 124.
22 Fowler, Pegasus Bridge, 58.
23 Ibid, 47.
24 Howard and Bates, The Pegasus Diaries, 127.
25 Fowler, Pegasus Bridge, 51.
26 Ambrose, D-Day, 132.
CPT W. Paul Hill is currently serving as a brigade assistant operations officer in 4th Armor Brigade Combat Team, 1st Armor Division. He previously commanded C Company, 1st Battalion, 29th Infantry Regiment, and B Company, 1st Battalion, 50th Infantry Regiment. He is a graduate of the Maneuver Captains Career Course and holds bachelor’s and master’s degrees in aerospace from Middle Tennessee State University.
 Share on Facebook
 email
email print
print
Figure 1 — Bradley ECP 1 & 2 Technologies